I want to tell you how I built a professional-looking custom WordPress website without writing a single line of code, without buying a premium theme, and without touching Elementor. The total cost was under $10, and the result is a custom-designed blog that looks nothing like every other WordPress site on the internet.
This is not a theoretical tutorial. This is exactly what I did, step by step, and you can follow along and do the same thing today.
I have built many WordPress sites over the years. I have used the Classic editor, page builder like Elementor, premium themes, child theme, everything. Recently, I decided to start a tech blog, and I wanted something unique and sleek without spending a lot of money and without putting in a lot of time into custom coding.
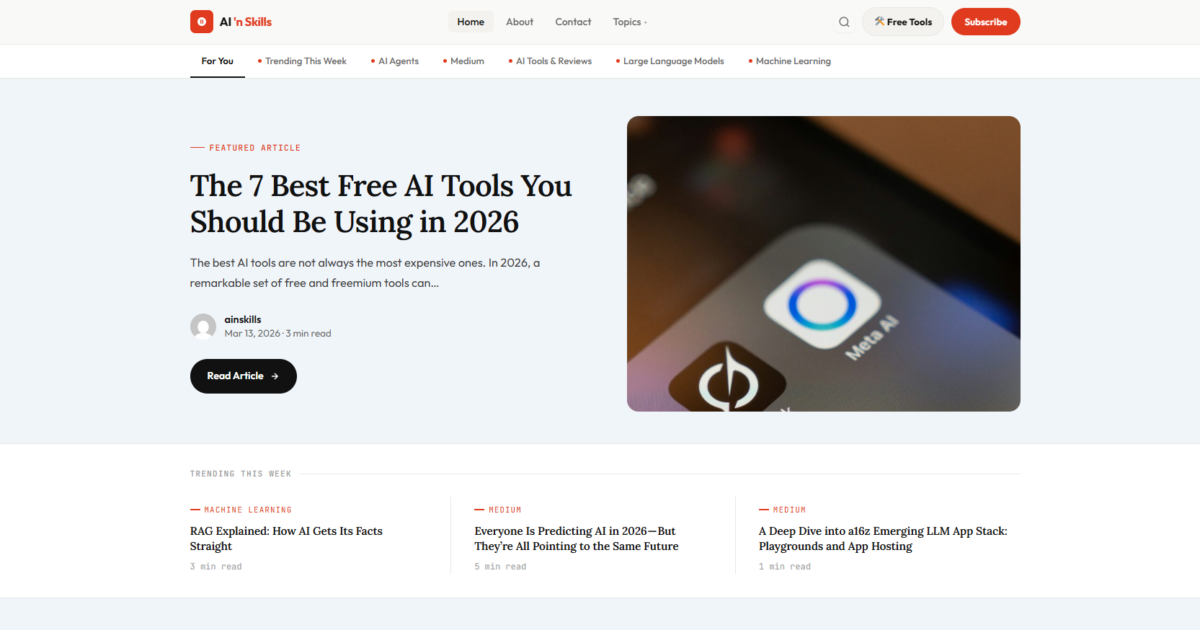
What stood out immediately about my site, ainskills.com, is how clean and minimal the overall design feels. I went with a simple, modern layout and a balanced color scheme that keeps everything easy on the eyes while still feeling professional. The structure is straightforward, so visitors can move around without confusion, which was very important to me.
The Problem With How Most People Build WordPress Sites
When most people start a WordPress blog, they follow the same path. They install WordPress, browse the theme directory, pick something that looks decent, then spend hours trying to customize it with the built-in block editor or a page builder like Elementor. The result usually looks fine, but it also looks like thousands of other sites using the same theme.
The alternative is hiring a developer to build something custom. For a basic custom WordPress theme, you are looking at anywhere from $500 to $2,000, depending on who you hire and what you want.
There is a third path that almost nobody talks about. You can use AI to design your theme visually, preview it before committing to a single thing, then convert it into a real WordPress child theme that runs on your actual site. No developer. No page builder subscription. No generic template.
This is that path.
What You Need Before You Start
Before diving in, here is everything you need:
- A Claude account — the free tier works to get started
- Local WP — free local WordPress development environment
- GitHub Copilot — around $10 per month, though a free trial is available, which is enough to make all your changes
- A hosting plan — any shared hosting works, Namecheap or Hostinger both start around $2-5 per month.
- FileZilla — a free FTP client for uploading your theme to your live host
- VS Code — free code editor (you will not be writing code in it, but you need it installed)
- Basic familiarity with WordPress admin — nothing technical
Total cost if you already have hosting: roughly $10 for one month of Copilot, which is enough to complete everything described here. If you use the Copilot free trial, the entire process costs nothing beyond your hosting.
Step 1 — Design Your Theme With Claude and Preview It as an Artifact
The first thing I did was open Claude and describe the kind of blog I wanted. I wasn’t very descriptive of the design details like the color scheme, fonts, etc., because I didn’t want to limit Claude’s creative ability. This was the prompt that I used:
“I want to build a tech blog using WordPress, but I want it to be entirely built with coding agents. I don’t want to build it with Elementor. I want to use free themes like Astra. So I want to start from you, how would you help me with that because I know that one can install worpress on their local machine, create a child them, then do all the work on their machine and upload it back to wordpress. Brainstorm this idea and tell me how it will work and give me a nice looking site.”
Claude produced the theme files, but here is where things got interesting. Before downloading anything or touching WordPress, I asked Claude to render the design as an Artifact so I could see exactly what it would look like.
If you have not come across Claude Artifacts before, I wrote a full breakdown of what they are and how they work here. The short version is that an Artifact is a live, interactive preview that Claude renders in a panel beside the conversation. For HTML and design work, this means you can see your website rendered in real time, click around it, and review it before committing to anything.
This is the part that changes everything. Instead of downloading a theme, uploading it to WordPress, activating it, and then realizing the header font is wrong, you see it all immediately in the Artifact panel. You ask Claude to change the font, and the Artifact updates. You ask for a different button color, and it updates the Artifact. You iterate until it looks exactly how you want it, all inside the conversation.
The first design Claude produced was almost perfect. The color scheme was elegant, and the design was straightforward and simple. I didn’t have to make many changes because I liked the overall design.
Once I was satisfied with the design, I asked Claude to convert everything into a proper WordPress child theme for Astra and package it as a downloadable zip file. Claude produced all the necessary files, including the stylesheet, functions file, header, footer, page templates, and JavaScript. I downloaded the zip to my computer.
Step 2 — Set Up Local WP and Install Your Theme
Before touching your live website, test everything locally. This is where Local WP comes in.
LocalWP is a free application that runs a complete WordPress environment on your computer. It handles the web server, database, and PHP configuration automatically, so you get a fully functional WordPress site running on your machine without needing any technical setup. Think of it as a private version of your website that only you can see, where you can test and make changes without any risk to your live site.
Here is how to get it running:
Download and install Local WP from localwp.com. It is available for Windows, Mac, and Linux.
Create a new site:
- Open Local and click the + button in the bottom left corner.
- Select Create a new site.
- Give your site a name. I used my blog’s name.
- Choose Preferred for the environment settings.
- Set your WordPress username, password, and email.
- Click Add Site and wait about 60 seconds for Local to set everything up.
Install the Astra parent theme:
- Click WP Admin in Local to open your WordPress dashboard.
- Go to Appearance → Themes → Add New
- Search for Astra
- Click Install. Do not activate it yet.
Upload and activate your child theme:
- Still in Themes, click Add New → Upload Theme.
- Upload the zip file Claude generated for you.
- Click Activate
Now, click Visit Site in Local or in your WordPress dashboard. Your custom AI-designed theme is live on your local machine.
Once my site was up on Local, I needed to fix a few things. The parent theme had some conflicts with the child theme. The search bar from the Astra theme was blocking the whole page. So now I needed to make some changes to the WordPress files, which now leads to the next step.
Step 3 — Fine-Tune Everything With VS Code and Copilot
Here is where the real magic of this workflow comes in, and the part that makes it genuinely no-code rather than low-code.
Once your site is running in Local, go back to the Local WP dashboard, select your site, and click the VS Code button. This automatically opens the entire project in VS Code, with all your theme files right there in the file explorer.
Now open GitHub Copilot in VS Code. If you do not have it installed, go to the Extensions panel in VS Code, search for GitHub Copilot, and install it. Sign in with your GitHub account. If you are on the free trial, it activates immediately.
Here is the key insight: you do not need to understand any of the code in these files to make changes. Copilot is an AI assistant built directly into VS Code that understands your instructions in plain English. You click on a file, open the Copilot chat panel, and describe what you want to change.
Some examples of what I did entirely through Copilot prompts, no code written:
- Changed the navigation font and made it sticky so it stays at the top when scrolling.
- Changed the placeholder-hardcoded email addresses to my custom emails
- Worked on the responsiveness of the website
- Added a ‘Free Tools’ button to the navigation
- Fixed all the conflicts between the parent and child themes
Every single one of those changes was done by describing what I wanted in plain English to Copilot. It found the right file, made the change, and I refreshed the Local site in my browser to see the result immediately.
Here are some of the prompts that I used to customize the site further to meet my desired goal:
1 – The contact page doesn’t look well on mobile. Looks squished
2 – On the about page, the contents touches the edges of the page. Add some padding.
3 – Now there are all these column boxes in those pages that when it’s phone sixe they still show maybe allfour in a row. Make them responsive to smaller viwing areas.
Even though some of my prompts were vague and contained spelling errors, Copilot still got the job done.
This combination of Local WP and Copilot essentially gives you a live development environment where you can iterate on your design conversationally, just as you did with Claude on the initial design, but now with your real WordPress theme files.
Step 4 — Export Your Theme and Go Live
— Install the Migration Plugin on LOCAL Site
- In your Local WP site → click WP Admin
- Plugins → Add New
- Search “All-in-One WP Migration”
- Install → Activate
— Export Your Local Site
- In WordPress dashboard → All-in-One WP Migration → Export
- Click “Export To” → select “File”
- It will package everything — database, theme, posts, images, settings
- Download the .wpress file to your computer
— Install Migration Plugin on LIVE Site
- Open your live WordPress site — go to yourdomain.com/wp-admin
- Log in with the credentials you set in Phase 1
- Plugins → Add New
- Search “All-in-One WP Migration”
- Install → Activate
— Import to Live Site
- In your live WordPress → All-in-One WP Migration → Import
- Click “Import From” → “File”
- Upload the .wpress file you exported
- Wait — this can take 3–5 minutes.
- When it finishes it will say “Import Complete”
- Click “Finish”
Important: The import will replace your live site’s admin credentials with your Local site’s credentials. So after import, log in with your Local WP username and password.
— Fix Your URLs
After import your site might still think it’s your_local_site_name.local. Fix this:
- Log into live WP Admin
- Settings → General
- Update both URLs to your real domain:
- WordPress Address: https://yourdomain.com
- Site Address: https://yourdomain.com
- Save Changes
- You’ll be logged out — log back in
Voila! Your Site is Live!
Step 5 — Making Future Changes With FileZilla
Once your theme is live, you will occasionally want to make updates — fix something, change a color, adjust a layout. You have two options.
Option A — Replace the whole theme. Make your changes locally in VS Code with Copilot, re-zip the theme folder, and re-upload it through WordPress admin the same way you did the first time. Clean and simple.
Option B — Update individual files with FileZilla. This is faster for small changes and is the method I recommend for most edits.
FileZilla is a free FTP client that lets you connect directly to your hosting server and manage files. Here is how to use it:
Get your FTP credentials from Namecheap:
- Log into Namecheap → cPanel
- Search for FTP Accounts
- Note your FTP hostname, username, and password
Connect with FileZilla:
- Download and install FileZilla from filezilla-project.org
- Open FileZilla and click File → Site Manager → New Site
- Enter your hostname, username, and password
- Protocol: FTP or SFTP
- Click Connect
Navigate to your theme:
- In the right panel (your server), navigate to public_html → wp-content → themes → your-child-theme
- In the left panel (your computer), navigate to your local theme folder
- To update a single file, just drag it from the left panel to the right panel
- FileZilla will ask if you want to overwrite — click Yes
For most edits, you will replace only one or two files at a time. Changed something in the CSS? Upload just style.css. Updated the header layout? Upload just header.php. This is much faster than re-uploading the entire theme every time.
This Method vs. The Alternatives
Let me be honest about how this compares to the other ways people build WordPress sites.
vs. Buying a Premium Theme
Premium themes like Divi or GeneratePress Pro cost between $50 and $200 per year. They look polished, but they also look like thousands of other sites using the same theme. With this method, your design is unique because you described it yourself. Nobody else will have your exact layout, color scheme, and typography combination because nobody else had that exact conversation with Claude.
vs. Elementor or Page Builders
Elementor is the most popular WordPress page builder. The Pro version costs $60 per year. It is powerful and visual, but it adds significant page weight to your site. Elementor-built sites are often noticeably slower than hand-coded themes, which affects both user experience and SEO rankings. The theme you build with this method is lean, fast-loading code with no unnecessary bloat.
vs. The Classic WordPress Editor
The classic block editor gives you layout control within your content area, but it does not let you design the overall look and feel of your site. The header, footer, card layouts, typography, sidebar, color scheme. All of those things require either a theme or a page builder. This method gives you full control over every element of your site’s design without needing either.
| This Method | Premium Theme | Elementor Pro | Developer | |
| Cost | ~$10 once | $50–200/yr | $60/yr | $500–$2,000 |
| Unique design | Yes | No | Partial | Yes |
| No coding needed | Yes | Yes | Yes | No |
| Fast loading | Yes | Varies | No | Yes |
| Full design control | Yes | Limited | Yes | Yes |
| Time to complete | A few hours | Minutes | Hours | Weeks |
Pros and Cons of This Method
Pros:
- Completely unique design that looks nothing like off-the-shelf themes
- Extremely low cost. One month of Copilot or even a free trial covers everything.
- No coding knowledge required at any stage
- Fast-loading lean code with no page builder bloat
- You own every file. No dependency on a third-party plugin staying active
- Full control over every aspect of the design
- Teaches you enough about how themes work that future changes feel manageable
Cons:
- Takes a few hours of setup compared to activating a ready-made theme
- Requires installing Local WP and VS Code. A bit more setup than a hosted page builder
- If something breaks, you need to ask Copilot or Claude to debug it rather than contacting plugin support.
- Copilot requires a GitHub account and a subscription after the trial.
- Not ideal if you need complex functionality, such as WooCommerce storefronts or membership sites. This method shines for content blogs.
Final Thoughts
I was very satisfied and happy after going live and making the necessary changes. I didn’t know what to expect when I tried this method, but in the end, I was very satisfied with it. It was very simple, and I never had to worry about making purchases I wouldn’t use for the most part.
I would definitely recommend this method for anyone who wants something simple yet unique and doesn’t have much web design expertise, since you’ll mostly use prompts to make design changes.
Even for someone with web design skills, I believe this is a better method because, if you compare a website I made with the Classic editor, Earn ‘n Smile, with this one, AI ‘n Skills, you will clearly see the difference in what I was able to achieve with Claude’s superior coding ability.
The tools exist today to build something genuinely good-looking without a budget, a developer, or months of coding. Claude handles the design thinking, Copilot handles the implementation details, and Local WP gives you a safe environment to see everything before it goes anywhere near the internet.
For anyone starting a blog in 2026 on a tight budget who wants a site that actually looks professional, this is the most practical path I have found.